 | Geocoding |
Addresses |
Check out Tools - Geocoding to do bulk geocoding using tables of existing addresses, converting them to x-y locations |
Choosing an address locator to use |
Once the service is selected, click on the OK button to bring up a window in which you select the table containing the addresses |
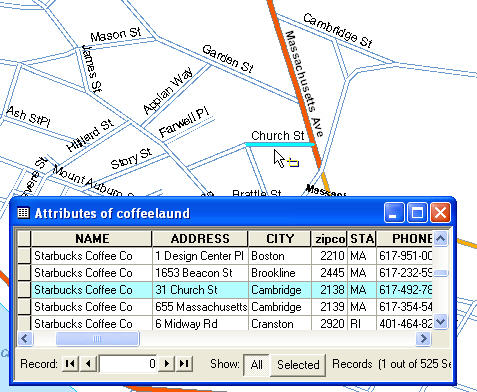
ArcView''s Geocoding Result |
How to create an address locator |
interactive Review if mismatched addresses |
geocoding options dialog box |
Address locator |
|
|
|
Save as layer file-export data Export data dialog box |
Tools - Add Route Events dialog box |


GEOCODING
Reference theme
-Usually a street map with attributes that specify street name, street type (Avenue, Street, Place) and address range for each street segments.
-other data might include directions (North Main)
Address table: usually a database file with addresses listed as ō1900 Pico Boulevardö
Geocoding process-3steps
1. Making the reference theme match table (use Tools-Geocoding-Geocode Addresses). Select an address style that best matches the attributes in the themeÆs database
2. Batch Match Address
-1900 would be street number
-Pico would be the street name
-Boulevard would be the street type
3. Re-match Addresses
- individually repair addresses that did not meet the initial match criteria
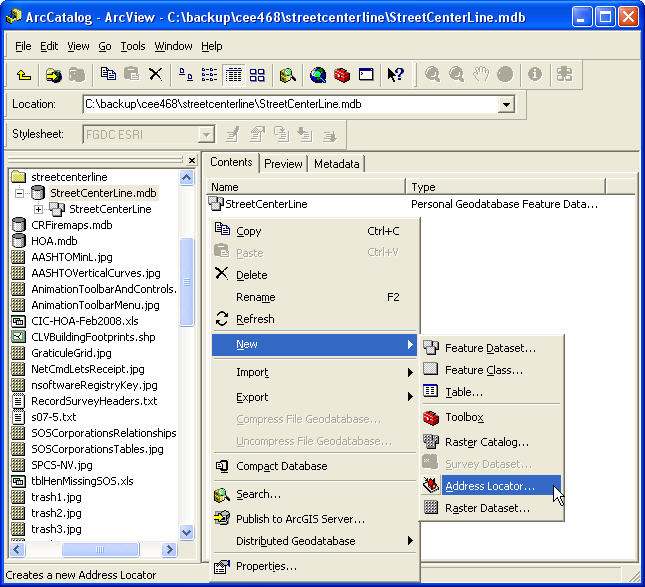
CREATING NEW ADDRESS LOCATOR
Open ArcCatalog -Address Locators-Create New Address Locator file. Double click on the New Address Locator and new dialog box will be open. Select STREETS WITH ZONES file for shapefile, or STREETS WITH ZONES (gdb) for geodatabase. OK, and new dialog box will be open.
-in the Name text box, type in an appropriate name for the New Address Locator (if you will not specify the name, you will get default name).
Click the browter button on the Primary Table tab. to find the shapefile the new address locator will use as reference data and add.
Save Locator on your flash and start new Map Document, bring in your base data and start geocoding.
WORKING WITH CAD DRAWINGS
Computer Aided Drafting (CAD) is the source for a GIS. ArcView used CAD data through the CAD Reader Extension thet can read AutoCAD .dwg, .dxf files and .dgn files
ADDING X-Y COORDINATE DATA AND/OR A ROUTE EVENT
You can create a shapefile (or layer) directly from text data stored in a table. ArcView can recognize 3 types of data: addresses, X-Y coordinate, and points are created into shapefiles directly from the original coordinate values.
Adding X-Y coordinate data
To add coordinate X-Y coordinates to map, the table must contain 2 fields for x and y coordinate. The values, latitude and longitude can be in meters or feet. Once the data is added to the map, the layer can be squired and symbolized.
General Steps:
-Click on the Tools menu on the Standard Toolbar and click Add XY Data.
-Click the table dropdown arrows and click the table that can contains x-y coordinate data. If the table is not already added to the map, click the Browser button to access it from disk.
-Click the X field dropdown arrow and click the field containing x-coordinate values.
-Click the Y field dropdown arrow and click the field containing y-coordinate values..
-Click Edit to define the coordinate system and units represented in the x and y fields. The x-y coordinate will be automatically transformed to match the coordinate system of the data frame. OK
Adding Route Events. Point and line route events. A route event table has at least two fields: an event key (identify the route) and one or more measure locations (one or two values describing the positions on the route where the event occurs).
General steps:
-Click the tool menu on the standard toolbar and click ADD ROUTE EVENTS
- Click the table dropdown arrow and click a table on your map or click the browse button to find one on disk.
- Click the type of route events the table of contains.
- Click the dropdown arrow and click the route key field
- Click the location field dropdown arrow and click the appropriate field.
- -Optionally, click the dropdown arrow and click the lateral offset fieldown arrow and click the route features class or browse for the route feature class
- -Click the dropdown arrow and click the route key field. OK.
- Click the layer dropd
About creating an address locator
One of the first physical processes in geocoding is the creation and tailoring of an address locator. This process always begins in ArcCatalog. Address locators can be created in any workspace such as a geodatabases or file folder. Right-click a selected workspace, click New, then click Address Locator.
How to create an address locator
Creating an address locator in ArcCatalog
Open a workspace in ArcCatalog. It can be a file folder or a geodatabase.
Right-click the workspace, click New, and click Address Locator to display the Create New Address Locator dialog box.
Click the address locator style you want to use to create the new address locator and click OK.
Learn more about commonly used address locator styles
Type a name and description for the new address locator in the Name and Description text boxes.
Click the Browse button on the Primary table tab.
Navigate to and click the feature class or shapefile that the address locator will use as reference data, then click Add.
Click the drop-down arrow and click the name of the field that contains the specified address information.
The required address elements appear with a bold field name.
Click the Alternate Name table tab if your address locator will use an alternate street name table.
Otherwise, skip to step 11.
Click the Browse button, navigate to and click the table the address locator will use as an alternate street name table, then click Add.
Click the drop-down arrow and click the name of the column containing the specified alternate street name information. Both primary table and alternate name table require a Join ID field.
The required alternate street name attributes have field names in bold type.
Click Place Name Alias Table if your address locator will use a place name alias table.
Otherwise, skip to step 15.
Click the Browse button, navigate to and click the table the address locator will use as a place name alias table, then click Add.
Click the drop-down arrow and click the name of the column containing the specified place name alias information.
The required place name alias attributes have field names in bold type.
Click OK.
Click OK to create the new address locator.
Streets Map
Creating an address locator
Geocoding ¢ Guide to Address Locating in ArcMap tutorial!!!
Matching addresses with location